Today, I’m delving into Telenor’s APN settings to ensure you experience smooth mobile internet connectivity. Whether you’re troubleshooting, setting up a new device, or traveling, configuring these settings correctly is essential for uninterrupted internet access.
Why Configure Telenor APN Settings?
In my experience, Telenor usually sends APN settings automatically to your device. However, manual configuration becomes necessary in scenarios like:
- New Device or SIM: When your device or SIM lacks pre-loaded APN settings.
- Traveling: Different regions may require specific APN configurations.
- Connectivity Issues: Incorrect or missing APN details can disrupt internet access.
Telenor APN Settings Overview
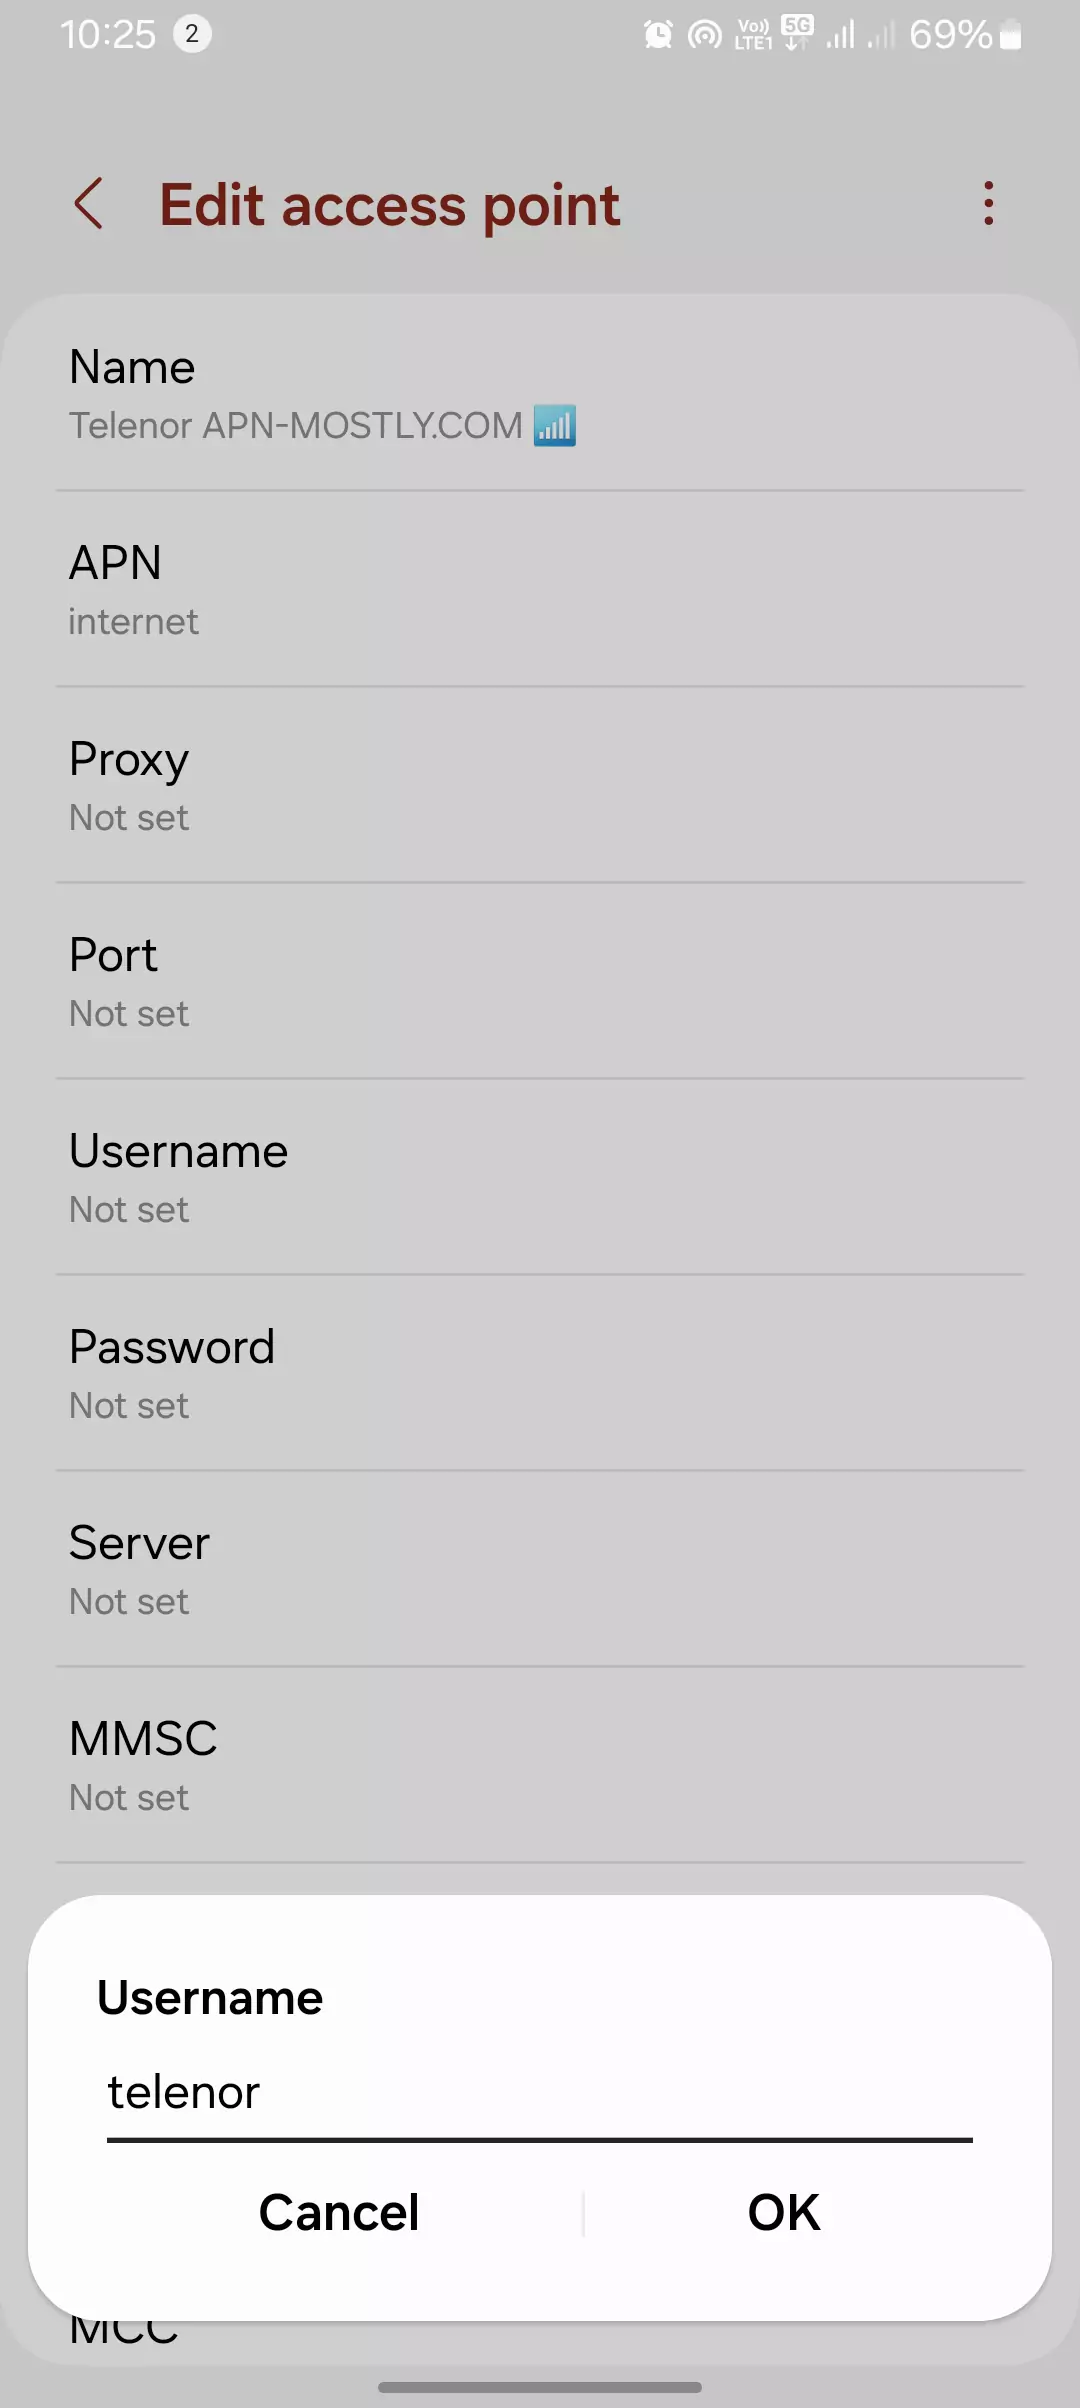
Internet Settings
- Name: Telenor
- APN: INTERNET
- Username: TELNOR (case sensitive)
- Password: TELNOR (case sensitive)
- APN Protocol: IPv4
- APN Roaming Protocol: IPv4
- MCC: 410
- MNC: 06
- APN Type: default, supl
- Bearer: Unspecified


These settings form the backbone of reliable internet connectivity with Telenor.
MMS Settings
- Name: Telenor MMS
- APN: MMS
- MMSC: https://mmstelenor
- MMS Proxy: 172.18.19.11
- MMS Port: 8080
- APN Protocol: IPv4
- APN Roaming Protocol: IPv4
Configure these for seamless multimedia messaging.

Finding the Correct Telenor APN Settings
Embrace Automatic Configuration
I always start with automatic configuration. It simplifies the process, ensuring your device receives the correct settings promptly.

Manual Configuration Magic
When automatic setup isn’t available, here’s how I approach manual configuration:
- Telenor Website Treasure Hunt: Navigate Telenor’s website for APN settings under “APN settings” or “internet settings” in the support section. Use the search function for efficiency.
- Customer Support Lifeline: Contact Telenor’s customer support for expert assistance, especially for region-specific APN details.
The Manual APN Configuration Process
Here’s how I navigate through manual APN setup:
- Access Settings: Navigate to your device’s Settings menu.
- Find Mobile Networks: Look for options like “Mobile networks” or “Cellular networks.”
- Access Point Names: Locate and tap on “Access Point Names” (APN).
- Add New APN: If needed, tap on “Add” or “+” to create a new APN profile.
The APN Information Puzzle
Ensure accuracy in these crucial fields:
- Name (APN): Match with Telenor’s official settings.
- Username and Password: Typically blank, but verify as per Telenor’s instructions.
- Extra Fields: MMSC and MMS Proxy settings are vital. Refer back to Telenor’s guidelines for accuracy.
The Save and Test Ritual
After configuration, I always test the connection immediately. It’s like taking your newly configured APN for a test drive to ensure everything works smoothly.
Troubleshooting Tips
Fix 1: Verify APN Settings Accuracy
Meticulously check each field for correctness. Even a minor error can disrupt connectivity.
Fix 2: APN Reset Magic
Reset to default settings and re-enter Telenor’s APN details if troubleshooting persists.
Fix 3: Network Mode Mastery
Switching network modes (e.g., 4G to 3G) can jumpstart the connection.
Fix 4: Firmware Finesse
Keep your device’s firmware updated to resolve persistent APN issues.
Fix 5: SIM Card Shenanigans
Ensure your SIM card is clean and properly inserted to avoid connectivity hiccups.
Fix 6: Manual Network Selection Trick
Manually select the Telenor network if automatic selection fails unexpectedly.
Fix 7: The Hidden Cache Clear
Clear network settings cache through recovery mode on Android devices for a fresh start.
Fix 8: Carrier Detective Work
Check with Telenor support for local network issues or maintenance impacting connectivity.
Fix 9: APN Type Experimentation
Try different APN types (e.g., ‘default’ vs. ‘internet+mms’) to find what works best for your device.
Fix 10: Roaming Revelation
Enable data roaming even when in your home area to broaden network signal availability.
Conclusion
That concludes our journey through configuring Telenor APN settings. These configurations are optimized for reliable internet access, regardless of your device. If you have specific needs for gaming or other applications, reach out or drop a comment below.
I hope these tips enhance your internet experience with Telenor. Thank you for reading, and have a fantastic day!

